
There are four ways to upgrade from an old to a new iPhone, and they differ more than Apple makes them out to be. One method requires both devices simultaneously, another doesn't require the old one, and one only saves passwords if a specific checkbox has been selected beforehand. This overview categorizes the methods and shows which one is suitable for which situation.
The migration itself is rarely the problem. The difficulties arise at the edges: when iCloud storage isn't sufficient, when apps get stuck in a waiting state after the transfer, or when it turns out after setup that Wi-Fi passwords and health data are missing. These issues are resolved before the first screen even appears.
Therefore, it's worth checking the system version of both devices beforehand. Different iOS versions are one of the most common causes of failed transfers, and those who initiate the update shortly beforehand run into the well-known problems associated with system updates.
Key Facts at a Glance
- Four methods: Quick Start wireless, Quick Start via cable, iCloud backup, and computer backup.
- Quick start requires both devices simultaneously, while iCloud backup works without the old iPhone.
- Passwords and health data are only included in the computer backup if encryption is active.
- If iCloud storage isn't enough, Apple provides additional temporary storage – with three time limits you should be aware of.
- The old iPhone will only be erased once everything has been transferred to the new one.
Before the move: the checklist
Regardless of the method, these points should be completed beforehand:
- Update both devices. Check for software updates under Settings, General. Different system versions can cause errors.
- Have your Apple account and password ready. Both will be requested during setup.
- Create a backup. Even during direct data transfer, as a safety net.
- Connect both devices to the charging cable. An interrupted connection can result in data loss.
- Unpair your Apple Watch. This will automatically create a watch backup, which will later be offered for restoration.
- Turn on Wi-Fi and Bluetooth. Quick Start won't work without both.
Method 1: Quick start wireless
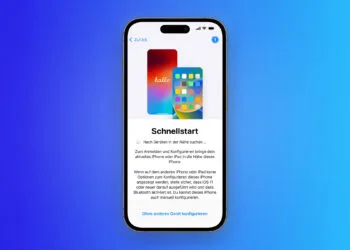
The standard method. Both iPhones are placed next to each other, and the transfer happens wirelessly. Apple's quick start guide requires iOS 11 or iPadOS 13 on the older device; for full data migration, iOS 12.4 or later is needed.
- Turn on the new iPhone and place it next to the old one.
- Confirm the quick start prompt on the old device.
- Scan the animation on the new screen with the old iPhone.
- Enter the code from the old device on the new one.
- Set up Face ID or Touch ID.
- On the "Transfer Data" screen, choose between direct transfer and loading from iCloud.
The difference between the two options is practically significant: With a direct transfer, both devices are locked until the end. When loading from iCloud, the new iPhone is immediately usable; apps are downloaded in the background.
This method, including troubleshooting, is described in detail in the Quick Start Guide.
Method 2: Quick start via cable
The process is the same, except the devices are directly connected. This helps with weak Wi-Fi signals and large data transfers. The required cable depends on the models involved: between two iPhones from the iPhone 15 onwards, a USB-C charging cable is used; if the data is coming from an iPhone 14 or older, a USB-C to Lightning cable is required.
Both devices will remain occupied until completion.
Method 3: Restore from iCloud backup
This method is the right one if the old iPhone is no longer available – lost, broken, or already sold. It relies on a previously created backup.
On the old device, the process is initiated under Settings, Apple Account, iCloud, iCloud Backup. On the new iPhone, the setup assistant guides you to the "Restore from iCloud Backup" option; then you select the desired backup.
Method 4: Via computer
Using Finder or the Apple Devices app is independent of internet speed and often the fastest method for very large backups. The old iPhone is connected via cable, the backup is created, then the new device is connected and restored.
There's a crucial catch: Passwords, health data, and Wi-Fi access information are only transferred with encrypted local backups. Without encryption, precisely the data whose loss causes the most work is missing.
Which method when?
| Method | Requirement | Ideal for |
|---|---|---|
| Quick start wireless | Old iPhone available, Wi-Fi | the standard case |
| Quick start via cable | Suitable cable, old iPhone available | weak Wi-Fi, large data volumes |
| iCloud Backup | existing backup | Old iPhone no longer available |
| Computer Backup | Mac or PC, cable | Very large backups, no iCloud subscription |
Temporary iCloud storage: three time limits
If you've bought a new iPhone and your iCloud storage isn't enough for a backup, Apple offers free temporary storage. You can access this via Settings, General, "Transfer/Reset iPhone" and then "Prepare for New iPhone".
The condition is often overlooked: the offer only applies if the available storage space is actually insufficient. Those with enough space won't even see the notification.
In addition, there are three deadlines that determine success or data loss in everyday practice:
| Deadline | Meaning |
|---|---|
| 21 days | Period within which the temporary backup must be restored |
| one-time 21 additional days | Extension via "Keep my backup longer" in case the new iPhone is delivered later |
| 7 days | Period during which the backup remains available after restoration |
Nothing should be deleted on the old device until the backup is restored. If the deadline expires, the backup will be permanently lost.
What gets transmitted – and what doesn't
Included are photos, videos, contacts, calendar, messages, app data, settings, and wallpapers, plus the watch backup. Wi-Fi and health data are only included with encrypted backups.
Not automatically included:
- App logins. Banking apps, authenticator apps, and WhatsApp require re-verification.
- Apple Pay. Cards are offered, but must be reactivated with the bank.
- Two-factor authentication codes from authenticator apps. These should be exported before the migration, otherwise you'll lock yourself out of the affected accounts.
- The eSIM. With many providers, the transfer happens directly during quick start or via settings, mobile network; otherwise, the process involves contacting the provider and setting up the eSIM.
After the move
The Apple Watch will be re-paired, and a backup will be offered. Apps will download in the background – with large media libraries, this can take hours, during which the iPhone should ideally remain connected to Wi-Fi and plugged into a charger.
Only once everything has arrived and is working should the old device be reset. If you then find that your new iPhone is fuller than expected, you can find the biggest bloatware by clearing the cache.
The point at which most moves fail
The choice of method isn't the real hurdle – all four methods work reliably. Problems almost always arise in two areas: storage space, because the deadlines for temporary backups expire unnoticed, and accounts, because authenticator apps simply arrive empty on the new device without having been exported.
Practically speaking, this means: Don't schedule the migration for the evening before an important appointment. Having two hours buffer time and exporting your two-factor authentication codes will save you more trouble than any method you choose. And if you're planning to buy a new device anyway, checking out an iPhone buying guide beforehand will help, as the storage capacity directly determines how smooth the next migration will be.
Which path went wrong for you last – storage, registrations, or the eSIM? Tell us in the comments what the problem was.
Frequently Asked Questions: Transferring data to a new iPhone
For Quick Start: place both iPhones next to each other, follow the instructions, and select Direct Transfer. Alternatively, the transfer can be done via an iCloud or computer backup.
Yes, but only with an existing backup. You can set up the new device from iCloud or your computer even if the old one is lost, broken, or already sold. Without a backup, there's no going back.
Not necessarily. If the available storage isn't sufficient for a backup, Apple provides temporary storage – the notification only appears in this case. Those with enough space won't see it at all.
21 days. If the new iPhone arrives later, the retention period can be extended once by another 21 days using "Keep my backup longer". After restoring, the backup remains for seven days.
A USB-C charging cable is used between two iPhones from the iPhone 15 onwards. If the data is coming from an iPhone 14 or older, a USB-C to Lightning cable is used.
During computer backups, they are only included if encryption was enabled. Without this option enabled, they are excluded – this cannot be rectified retroactively, only with a new encrypted backup.
Only after everything has arrived and is working on the new device. This is especially important with a temporary iCloud backup: nothing should be deleted on the old iPhone until the restore is complete.