

This article may contain affiliate links. Learn more on our Partner Program page.
If a Mac is lost or stolen, in the worst-case scenario not only is the hardware gone, but every file on it is in the wrong hands. FileVault puts a stop to this by making the data unreadable without the login password. Activation takes less than a minute on modern Macs – and the effect is permanent.
FileVault is Apple's built-in disk encryption for macOS and the basic security measure for any Mac containing more than just trivial data. While a strong login password blocks direct access, FileVault goes a step further and renders the data itself unreadable—even if someone removes the SSD and accesses it on another computer. The foundation for this remains a strong, unique password, as the encryption links access precisely to it. The guide to secure passwords on Apple devices explains what such a password should look like and how to manage it.
Key Facts at a Glance
- FileVault links decryption to the login password – without this linkage, the data is practically accessible without any obstacle in everyday use.
- On Macs with an Apple chip or T2 chip, activation is completed almost instantly because the SSD is hardware-encrypted anyway.
- Older Macs without these chips actively encrypt on the first pass, which can take hours depending on the amount of data.
- If you forget your password, you can choose between your Apple account or a 24-digit recovery key.
- If the password and recovery key are lost, the data is irretrievably gone – even Apple cannot open it.
What FileVault Actually Does on Your Mac
FileVault encrypts the user data on the startup volume. As long as the device is locked or powered off, the data remains unreadable on the SSD. Only after entering the login password are the data decrypted in the background and made usable. This is achieved using XTS-AES-128 with a 256-bit key.
One subtle point to consider: Since macOS 11, the system volume is secured by a signed system volume, while encryption protects the data volume – specifically, the part where photos, documents, and saved accounts are located. In practice, this doesn't change the outcome, but it explains why Apple differentiates between the two volumes in its technical documentation on volume encryption.
That's precisely the core of theft protection. Without active encryption, the data layer is vulnerable as soon as someone gains physical access to the hard drive. With FileVault, it remains locked – anyone who opens the Mac, removes the SSD, and puts it in an external enclosure will only see encrypted data instead of readable folders.
Apple chip, T2 and older Macs compared
How FileVault works depends on the chip used – and this difference is often misunderstood. On every Mac with an Apple chip or Apple T2 security chip, the SSD is already hardware-encrypted by default. Encryption and decryption are handled by a dedicated AES engine that is directly connected to the Secure Enclave. This sounds like complete protection, but there's a catch: Without FileVault, the key is solely tied to a hardware identifier embedded in the chip, and not to the password.
After activation, this changes. Only the combination of user password and hardware identifier unlocks the data. The keys themselves remain in the Secure Enclave and are never directly exposed to the main processor.
The situation is different for older Macs without an Apple chip or T2 chip. These lack hardware-based full disk encryption, which is why FileVault must first actively encrypt the data. During this time, the Mac can be used normally; the encryption runs in the background and resumes automatically after a restart.
| Mac with Apple chip | Mac with T2 chip | Older Mac without both | |
|---|---|---|---|
| SSD encrypted by factory | Yes | Yes | no |
| Key management | Secure Enclave | Secure Enclave | Software |
| Activation duration | almost immediately | almost immediately | up to several hours |
| Mac can be used during this time | Yes | Yes | Yes |
Enabling FileVault in macOS
Setup requires an administrator account. The path runs through System Settings:
- Open the Apple menu and select "System Preferences".
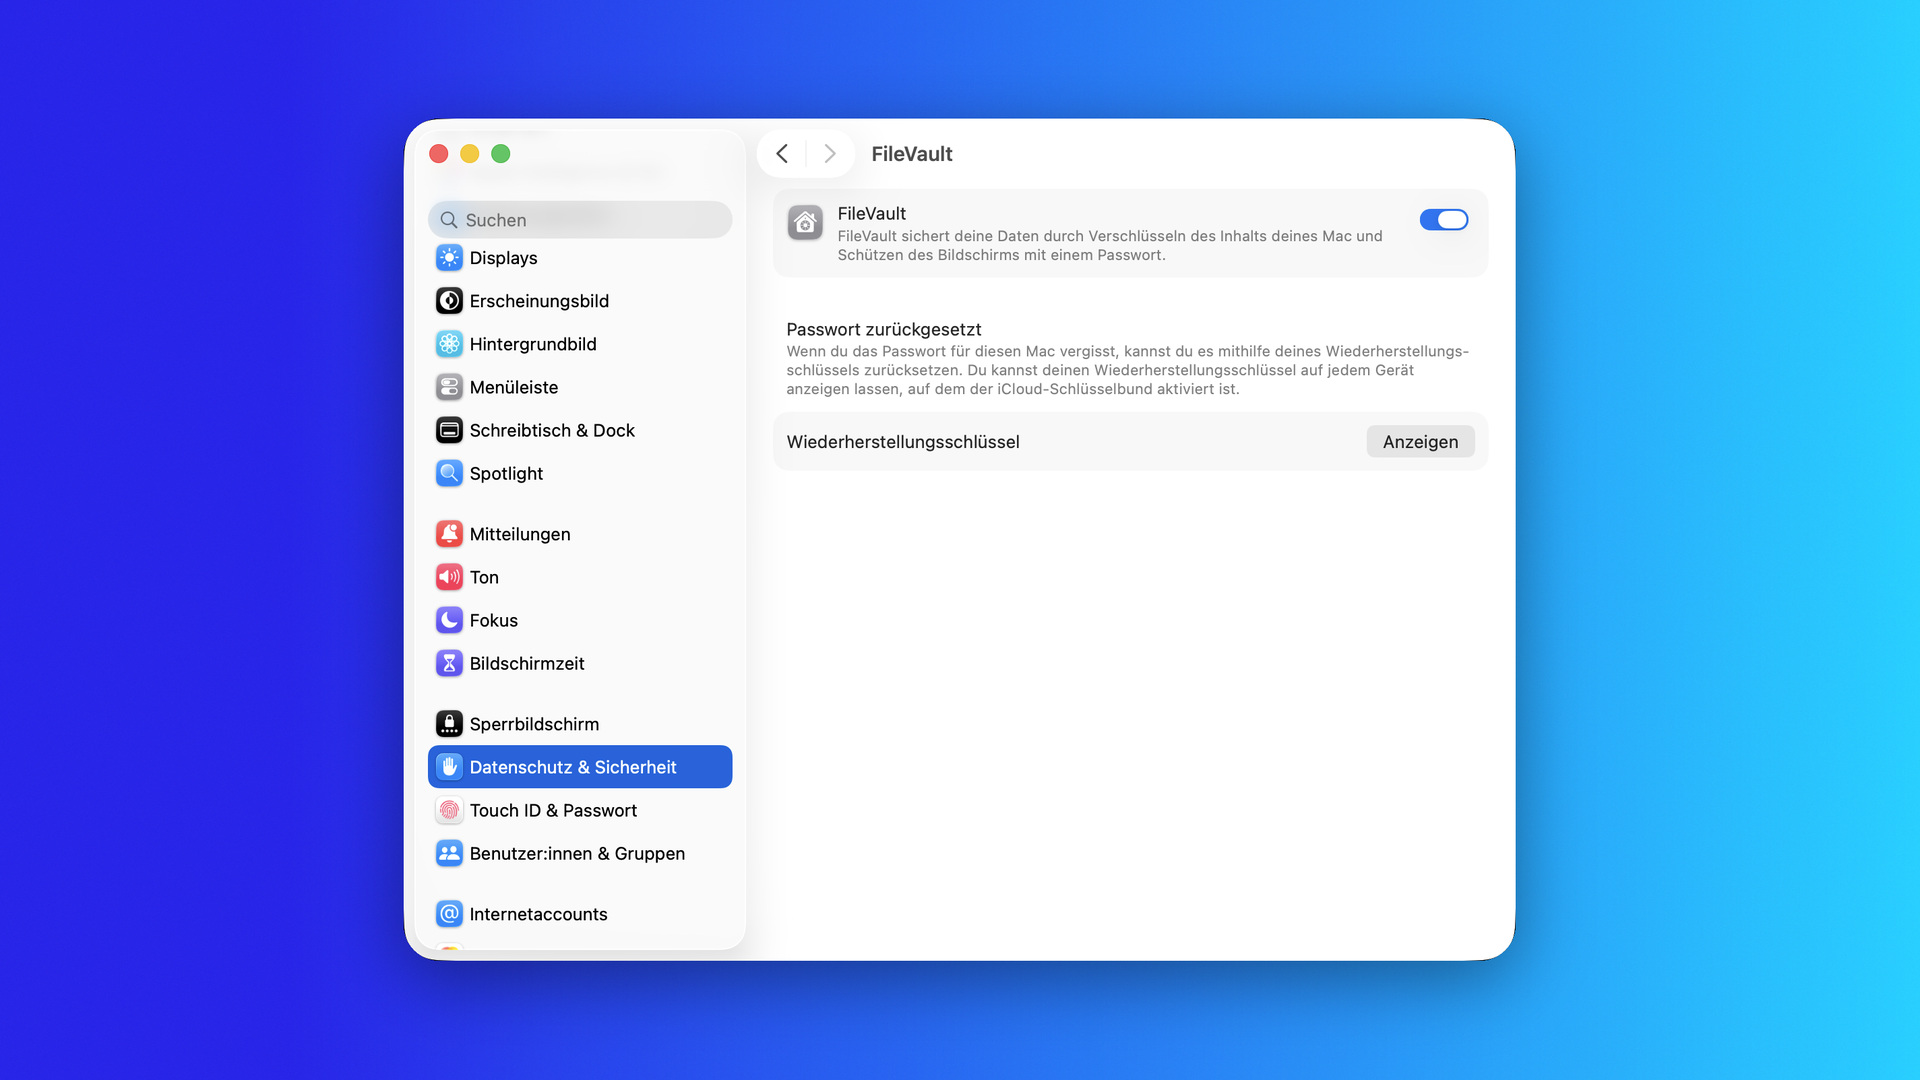
- Click on „Privacy & Security” in the sidebar and scroll down to the „FileVault” section.
- Click "Activate" next to FileVault.
- Enter your password when prompted and then specify how the hard drive can be unlocked if you forget your login password.
The encryption process then begins. The exact procedure is also described in Apple's guide to protecting Mac data.
Choosing a Recovery Key or Apple Account
During activation, you determine how the hard drive can be unlocked in an emergency. Two methods are available:
- Via the Apple account: In this case, the account is authorized to unlock the hard drive or reset the password. In system settings, the option is still labeled as an iCloud account. This is convenient, but it shifts the responsibility for data security to the account itself. A strong password and active two-factor authentication are therefore mandatory.
- Using a recovery key: Alternatively, macOS generates a sequence of 24 random numbers and letters that works independently of the Apple account. macOS displays this sequence during setup.
Which option is better depends on your individual security needs. A separate key is the stricter, but also more inflexible, solution. Those who choose the account-based method should know how to reset a forgotten Apple account password – their entire access depends on it.
Storing the Recovery Key Safely
Here's the most important rule regarding FileVault: If you choose to use a recovery key, keep it offline – ideally printed out and stored in a secure location, separate from your Mac. A piece of paper next to your computer won't do the trick.
This applies without exception: If both the login password and the key are lost, the encrypted data is irretrievably gone. Even Apple or an authorized service partner cannot open a FileVault-encrypted hard drive without the password or recovery key. This uncompromising strictness is the very purpose of encryption – it reliably protects against unauthorized access, but it does not forgive lost login credentials.
Enable additional users on the same Mac
If multiple people share a Mac, their data is also encrypted. However, to log in after a restart, they must be individually activated. If a button to activate users appears during setup, the corresponding login password must be entered once for each account.
If this step is skipped, the affected account will not be able to unlock the Mac after startup – a stumbling block that only becomes apparent upon the next restart.
What changes after turning it on
With FileVault enabled, macOS automatically activates several additional security features. Automatic login at startup is no longer possible; the Mac now always requires a password. The same applies after waking from sleep mode and when exiting the screensaver. This is by design: encryption is of little use if the device is constantly left unattended.
One detail to keep in mind: once the initial encryption process has started, FileVault cannot be deactivated until it is completely finished. This isn't an issue on modern Macs, but it can take some time on older devices.
External drives and Time Machine backups
Those who back up regularly should consider the security measures as a whole. An unencrypted backup on an external SSD effectively bypasses the Mac's encryption because the same files are stored there unencrypted. The option for an encrypted Time Machine backup can be found directly in the Time Machine settings.
Technically, the encryption of external drives works differently than internal encryption: it doesn't use the Secure Enclave, but instead functions like a Mac without an Apple or T2 chip. The protection remains effective, but depends solely on the chosen password. Those who regularly use external storage devices will find further use cases in our guide on how to move apps to an external SSD.
Disabling FileVault Again
Should encryption ever need to be disabled, it can be done via the same route: System Preferences > Privacy & Security > FileVault, then click "Disable" and confirm with "Disable encryption." macOS will then decrypt the hard drive again—a step that is not recommended in most cases.
FileVault as One Piece of Apple's Security
FileVault covers a clearly defined area: the data stored locally on your Mac. For content in the cloud, a different mechanism kicks in – Advanced Data Protection for iCloud, which secures iCloud backups, photos and more with end-to-end encryption. Local encryption on the Mac and end-to-end protection in iCloud complement each other into a seamless concept.
On the iPhone, a similar function is performed by the stolen device protection feature, which additionally secures access to sensitive functions. And because encryption works best on an up-to-date system, regularly installing every Apple security update is part of the same basic maintenance.
FileVault Belongs on Every Modern Mac
The feature is free, doesn't slow down current Macs, and protects exactly what matters most in a crisis: your data. For anyone who takes a MacBook with them or stores sensitive documents, activating it is practically a must. The only real drawback is the return journey – and that's where the real decision lies.
The recovery key is the more secure option because no one but you has it. An Apple account is more convenient, but it shifts the attack surface to an account that's accessible online. If you choose the account route, you should secure it accordingly – a suitable password manager is more valuable than any additional system setting.
Do you rely on your Apple account for recovery, or do you keep the printed recovery key in a file? Tell us in the comments how you handle it.
Frequently Asked Questions: FileVault on Mac
Not noticeably on Macs with Apple silicon or a T2 Security Chip. There, the SSD is hardware-encrypted anyway, and a dedicated AES engine handles encryption and decryption. Only older Macs without this hardware have to crunch through the first pass; after that, everything runs as normal again.
Then the encrypted data is irretrievably lost. Without login credentials or a recovery key, a FileVault drive can no longer be opened – not even by Apple or an authorized service partner. Therefore, securely storing the key separately from the Mac is absolutely essential.
Technically yes, but without FileVault, the key is solely linked to a hardware identifier embedded in the chip and not to the password – the data is practically accessible without any barrier in everyday use. Only FileVault links decryption to the login password.
On modern Macs, the process is almost instantaneous because nothing needs to be re-encrypted. On older devices without an Apple chip or T2 2 chip, the first pass can take several hours, depending on the amount of data. The Mac remains fully usable during this time.
It consists of 24 random numbers and letters that macOS displays during setup. The string should be written down exactly as it is displayed – a single transcription error renders it unusable.
Yes. While your data is encrypted, each account needs to be activated once to unlock the Mac after a restart. This is done by entering the respective login password during setup. If this step is skipped, it won't be noticed until the next startup.
Yes, the two complement each other. Advanced Data Protection secures the data stored in iCloud with end-to-end encryption, while FileVault protects the content held locally on the Mac. Only together do they form a seamless protection concept.